By Alexx Strobridge, process engineer, Brown Machine Group
Thermoformer adjustments by operators are more important than ever, since travel and building occupancy restrictions put in place to minimize the spread of COVID-19 make it more difficult for OEM maintenance teams to access equipment installed in plants. The good news, however, is that a small number of regular adjustments can make a major difference in thermoforming performance. What’s more, when issues arise, a checklist of 10 possible problems and solutions can help to resolve all but the trickiest thermoforming concerns. With this information, operators can maintain equipment and keep it running smoothly day to day and year after year.
Rail adjustments ensure peak performance
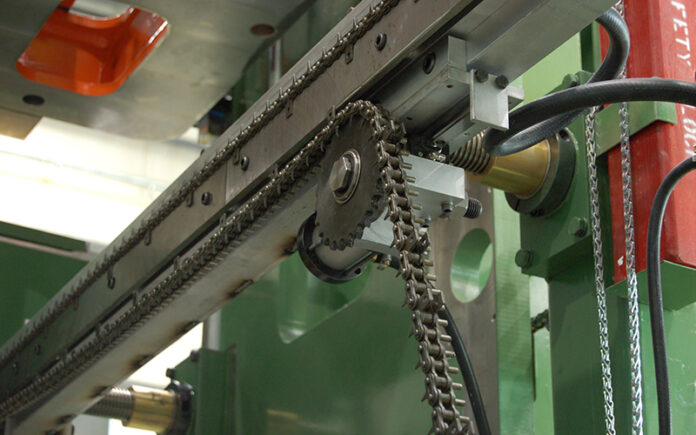
Basic rail adjustments throughout thermoforming equipment’s lifetime helps to ensure peak performance, as well as to prevent issues from surfacing. There are a few major adjustments that should be made regularly – often more regularly than operators expect – in order to prevent performance issues.
First, operators should regularly check the rail and tool alignment and make minor adjustments as necessary. Rails need to start parallel to the mold, and there should be 3/8” to 1/2” per side between the rails and the mold. If the rails are too close to the mold, damage to the mold and chain rails may occur. Issues in these alignments are common, so remember to check and adjust before major performance problems begin to occur.
Another adjustment to be monitored is the need to set the height of cooling tubes, especially if materials are being changed regularly. The standard wisdom is that cooling tubes should be set to the material thickness plus 0.020” to 0.030”. If using materials thinner than 0.030”, though, setting the cooling tubes with this much clearance will result in issues; instead, with thinner materials, set the cooling tube height with a double layer of material. If set too high, rippling in the sheet known as webs can occur as the material lifts off of the pin chain and is folded over. Set too low, the cooling tubes cause excess drag and dust is produced.
Finally, chain adjustments are necessary to keeping up reliable performance. Wear and stretching of the chain at uneven rates can lead to issues with shot alignment and tracking. That wear and stretching is natural over time, and might be worsened by the sheet pulling or melting unevenly. Chain tension also should be checked regularly, as it must be equal in both chains. If tension is too loose, there may be ripples and alignment issues; if it is too tight, there can be excess wear on sprockets and wear bars. Mechanical tensioners are inconsistent compared to pneumatic ones, but even pneumatic tensioners can result in uneven tension if not checked appropriately. Chains should be replaced as needed when stretching or wear occurs, and if one chain needs replacement, both should be replaced at the same time to maintain consistent tension.
Troubleshooting common issues
Some shot to shot misalignment may occur even if the above adjustments to the rail are made. When issues arise, especially now when experts from OEMs can’t travel to service and maintain equipment in person, it can be helpful to have a checklist for troubleshooting. Below are listed the ten most important steps for troubleshooting misalignment and other common issues in thermoforming applications.
1. Cooling Tubes: Make sure cooling tube heights are set to twice material thickness, or, for thicker materials, at a maximum of 0.020”-0.030” above the material height. This can be accomplished with a gauge between the top of the chain and the cooling tube.
2. Pierce Wheels: Set the pierce wheels at the infeed of the chain rail so the sheet is being pushed all the way down onto the pin. This ensures that the sheet is set in correctly, thus eliminating unnecessary stress to the chain, saddle, or guidebar and premature wear.
3. Clearances: Keep the distance from the edge of the tool to the chain down to a maximum of half an inch per side, and watch the clearance between the chain rail’s chain adjuster bolt head and the side of the form tool. Some thicker materials are forgiving and can tolerate wider tolerances, but especially with high shrink value material or a lot of cavities, the narrow gap is imperative.
4. Parallel Chain Rails: Be sure to start with the chain rails parallel to the form tool. Each side should have 3/8”-1/2” clearance on the outside of the form tool to the chain on the rail. Chain rails need to be set up parallel from the form station stabilizer to the exit end of the machine. If a “V” formation is needed, it should not exceed 2”, and should be done from the infeed of the machine to the infeed form station stabilizer rod only. From the mold to the exit end of the machine, parallel chain rails are imperative.
5. Chain Stretch: Chains can stretch and wear over time. To check this, first measure a certain number of links (say, 60) at the same spot on each chain. If there is a difference, even a slight one, it’s likely that stretch has occurred. Next, remove both chains from the rails, lay the chain on the floor, and place the pins on the chain facing each other, making sure the chains are pulled tight equally. Measure the chains, and if one is longer than the other or the pins don’t align, replace both.
6. Stripper Plate Location: The stripper plate should not extend below the sheet line when stroked, and it should stroke as the platen is retracting. The stripper plate should hold sheet in place and almost appear to stay still as the sheet evacuates the cavities. If the sheet bows upwards, making it hard to strip parts out of the mold, the stripper plate may need adjustment.
7. Exit Pan Location: The exit pan between the rails and after the tool should be set at the sheet line. The pan should set so the sheet is not able to sag when indexing out of the mold. Problems occur frequently, especially with thinner materials, if the exit pan is lowered and the sheet doesn’t catch the pan and is bound instead.
8. Sheet Orientation: Sheet orientation can cause issues. To check it, submerge a 6” square piece of material into 400ºF hot cooking oil or place in a 400ºF oven. Once heated, measure the difference from the cold to the heated materials both in the index and across index directions. A sheet orientation of greater than 10% may cause problems.
9. Proper Cooling: Improper cooling in the molds can lead to costly problems, and may be caused from cooling channels getting plugged, running the line too quickly, or using a heat exchanger or chiller with insufficient capacity. One way to determine whether cooling issues are occurring is to check the web temperature with an infrared temperature gun; temperature variance between the front, middle, and back of the sheet should not exceed 5ºF.
10. Centering Chain Rails: Check to ensure the rails are centered. This may be achieved through the use of centerline bars or platen key ways, and a string through the machine marking the center line. There should be the same distance from all adjustment screws to the centerline.
Conclusion
Through careful maintenance and regular adjustments, as well as targeted troubleshooting when issues occur, it is possible to maintain thermoforming performance at high levels across the equipment’s lifetime.
To ensure proper adjustments are made to maintain thermoforming equipment in top condition, Brown Machine Group offers a range of support services to assist operations.
For more information, email sales@brown-machine.com or call 989.435.7741, ext. 1213.


