by Jeremy Williams, consultant/trainer, RJG, Inc.
 Tired of spending thousands of dollars running non-conforming product, rebuilding a damaged mold or overhauling a machine?
Many factors can determine the success of an injection molding process. As molders, we are dependent upon the robustness of the part design, quality of material and how well the mold has been designed and constructed. Once we receive the part print, mold and material, we need to focus on building a process that can deliver millions of quality parts to the customer.
 Determining machine capability
There are key factors in determining if the molding machine has the capability that is required to mold parts on a consistent basis. The injection unit must have the correct shot volume to avoid degradation and unmelt. It also must have pressure in abundance and a flow rate high enough to allow for proper part filling.
 We discuss the plastic variables on a regular basis, focusing on how important it is to process from the plastic’s point of view. It’s important to dry the material to appropriate moisture content, process within the recommended melt temperature, select the correct flow rate for injection, apply adequate hold time and pressure, and cool long enough to maintain
  dimensional stability. However, these variables only focus on the injecting of the material during the process.
The clamp end of the machine is responsible for providing force to counter all of the pressure that is applied from the injection unit. How much tonnage is applied, location of the force, type of clamping mechanism and size of mold base all affect the success of the molding process. Determining the correct tonnage is not a simple task. It provides a foundation that must be rock solid to avoid flash and damage. Is it possible to apply too much clamp force, narrowing the process window before molten material is ever injected?
In the following examples, we will focus on using a DECOUPLED MOLDINGSM II processing strategy. During the DECOUPLED MOLDING II process, the filling of the cavity is separate from the pack/hold phase. The filling stage should yield a part that is 95 to 98 percent visually full, resulting in zero pressure at the end of the mold cavity. As the machine transfers from velocity to pressure control for the pack/hold phase, the cavity becomes visually full. Additional material is packed into the cavity to minimize sinks and decrease dimensional variation. Inside the cavity, the pressure increases; therefore, the clamp must provide enough force to overcome the pressure applied in the cavity.
Determining clamp tonnage
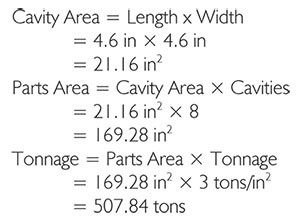
The starting point for determining appropriate clamp tonnage is to calculate the projected area of a single part. Then any core out surface area shall be removed from the overall surface area of the single part. Once the total surface area of the part is determined, we must multiply it by the number of cavities in the mold. If the mold has a cold runner, this must be taken into consideration as well. Again, we need to determine the surface area of the entire runner.
When completed, we must add the total projected area of all parts to the total projected area of the runner. After obtaining the total projected area, we then must multiply that area by a tonnage factor. Tonnage factors can be found on the material specification sheets. As time passes, that information rarely finds its way onto those data sheets. Typical tonnage factors can range from 2 to 10 tons/inch², but for a starting point we recommend 3 tons/inch².
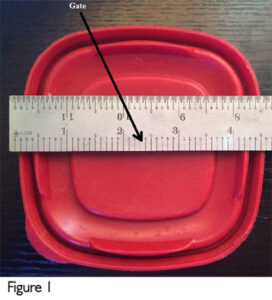
As an example, let’s propose molding a lid for a square leftover dish (Figure 1) with a hot runner mold and eight cavities.
Now we have a starting point to determine what clamp tonnage is correct for this mold. There are other factors that must also be taken into consideration to determine if the tonnage required will be above or below 3 tons/inch2:
- Melt Flow Index or Rate
- Flow Length
- Wall Thickness
- Gate Location
- Gate Size
- Gate Quantity
- Volume of Resin
Melt flow index/rate
The first item that needs to be considered after calculating the tonnage based on projected area is how the material flows. Melt Flow Index (MFI) or Melt Flow Rate (MFR) can be found on the material data sheet from the supplier. A material with a high MFI or MFR will require less pressure from the injection unit to complete the packing phase; therefore, the tonnage required will be less.
When evaluating the MFI or MFR, it is imperative that a comparison is done only between the same types of resin. The reason for this is the ASTM test has a different temperature, orifice size and weight for each type of resin. These values do not directly correlate with molding due to how the ASTM test is performed and how molding machines operate. The MFR or MFI relate more closely to the packing phase since it is typically at a much lower flow rate than the filling phase.
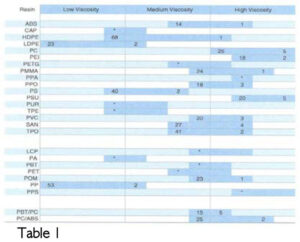
When reviewing our example of molding a lid, the material selected was a Low Density Polyethylene (LDPE). If we review the chart in Table 1, the material likely will have a very low viscosity, indicating that the pressure required from the injection unit to pack the part will be fairly low. Therefore, based on material selection, the tonnage required likely will be less than the typical 3 tons/inch².
Flow length and wall thickness
Next we need to evaluate the flow length and the wall thickness. This is referred to as the aspect ratio, comparing the flow length to wall thickness (from gate to end of fill). Generally speaking, an aspect ratio less than 150:1 has a low risk of sinks, short shots or dimensional issues.
In our example of molding a lid, the flow length is 3.00″ and wall thickness is 0.100″
 With a very low aspect ratio, the required pressure to pack this part will lower, thus further reducing the required clamp tonnage to hold the mold closed. In addition to lower tonnage, the probability of molding sinks, short shots, or out of tolerance parts is reduced.
Gate size and number
Next we need to evaluate the gate size, as well as the number of gates. A larger gate diameter has a much larger surface area for material to flow through, thus requiring less pressure from the injection unit to fill and pack the part. The number of gates will affect the injection pressure during filling and packing. If there is a greater number of gates, a larger surface area, or if sequentially filled requires less injection pressure, the result is a lower required tonnage.
In the example of molding a lid out of LDPE, there is a single gate that has a diameter of 0.030″
 This is a very small surface area to inject 23 grams of material per cavity. Given this amount of material and the gate size, one could expect the injection pressure during the packing phase to be slightly higher; therefore, the tonnage requirements would be a little greater than 3 tons/inch².
Simulation
Ultimately, the best method to determine required tonnage is to run a simulation with correct geometry, characterized material and full runner system. Without simulation, we can draw conclusions from evaluating part geometry, material selection, gate size, gate location and gate quantity. Based on these factors, an expected range for this mold most likely would be 339 to 508 tons (2 to 3 tons/inch²). A good starting point would be at 420 tons of clamp force.
Effects of too much tonnage
Now that we have focused on how to determine appropriate clamp tonnage, let’s take a look at the effects of applying excessive tonnage.
Here are some typical molding defects that can be seen on parts almost immediately:
- Burns
- Short Shots
- Gloss Level changes
Part quality is not the only item affected when excessive clamp tonnage is applied. There are long-term effects from overclamping that will damage the mold and machine.
First let’s review several of the side effects on the mold:
- Crushed Vents
- Rolled Parting Line
- Broken Inserts
- Cracked Core or Cavity Block
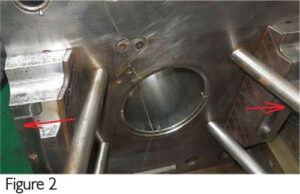
Figure 2 is an example of a mold that was clamped at four times the required tonnage. Based on surface area, material, and gating, the mold required roughly 100 tons (3 tons/inch²). The molder was inexperienced and set the clamp tonnage to the machine maximum of 400 tons (12 tons/inch²). Despite a robust mold design, quality steel, proper machining, and correct heat treating, the result of excessive tonnage was that the cavity block separated in two locations. Each split ran the entire depth of the cavity block (roughly 10″) from parting line to clamp plate. This was a catastrophic failure that caused delays in production and upwards of $100,000 to expedite the manufacturing of a new cavity block.
Here are some potential failures on the molding machine when excessive clamp force is applied:
- Cracked Hydraulic Cylinder Mounting Plates
- Deformed Platens
- Fractured Machine Frame
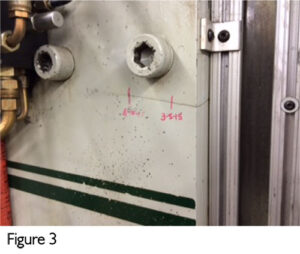
In Figure 3, there were several contributing factors that caused the frame rails to break on this vertical molding machine. First, the mold required about 10 tons to be held shut against the forces of injection, but the clamp tonnage was set to 100 tons. Second, the mold base size covered less than 2/3 of the distance of the platen in both directions. Combining these two poor practices over years not only fractured the machine rails but also caused molding defects and mold failure. No one was sure when the failure occurred on the machine, but they did identify when it was first discovered and “documented” its progression over time. Replacing both machine rails cost thousands of dollars for material alone. If we factored in the labor hours to disassemble and re-assemble nearly the entire machine and the scrap produced over the years, the number could easily exceed $200,000.
Conclusion
We need to ensure enough clamp force is used to hold the mold closed during injection despite changes to material viscosity. However, we do not want to apply excessive force that can create molding defects, mold damage or machine failure. More is not always better, especially when it reduces profitability.
Jeremy Williams has over 16 years of experience in the plastics industry serving the medical, automotive, furniture and appliance industries. He previously worked as a principal engineer, taking projects from design concept to saleable products. Williams earned his Master Molder II certification in 2011, became an RJG Certified Trainer in 2012, and started at RJG in 2016. In addition to his extensive manufacturing background, he holds degrees in plastics and business. For more information, visit www.rjginc.com.

